Java Development Kit (JDK), officially named "Java Platform Standard Edition (Java SE)", which is freely available from Sun Microsystems (now part of Oracle), is needed for writing Java programs. The mother site for JDK (Java SE)
"JDK" or "JRE"?
JRE (Java Runtime) is needed for running Java programs. JDK (Java Development Kit), which includes JRE plus the development tools (such as compiler and debugger), is need for writing as well as running Java programs. In other words, JRE is a subset of JDK. Since you are supposed to write Java Programs, you should install JDK, which includes JRE.
JDK Versions
The various JDK versions are:
- JDK Alpha and Beta (1995): Sun announced Java in September 23, 1995.
- JDK 1.0 (January 23, 1996): Originally called Oak (named after the oak tree outside James Gosling's office). Renamed to Java 1 in JDK 1.0.2.
- JDK 1.1 (February 19, 1997): Introduced AWT event model, inner class, JavaBean, JDBC, and RMI.
Installing JKD and JRE
JDK/JRE
I recommend that you install only the latest JDK. Although you can install multiple versions of JDK/JRE concurrently, it is messy.
If you have previously installed older version(s) of JDK/JRE, un-install ALL of them. Goto "Control Panel" ⇒ "Programs" ⇒ "Programs and Features" ⇒ Un-install ALL programs begin with "Java", such as "Java SE Development Kit ...", "Java SE Runtime ...", "Java X Update ...", and etc.
Step 1: Download JDK
- Goto Java SE download site @ http://www.oracle.com/technetwork/java/javase/downloads/index.html.
- Under "Java Platform, Standard Edition" ⇒ "Java SE 8u{xx}", where {xx} is the latest update number ⇒ Click the "JDK Download" button.
- Look for the latest "Java SE Development Kit 8u{xx}" ⇒ Check "Accept License Agreement".
- Choose the JDK for your operating system, e.g., "Windows x64" (for 64-bit Windows OS) or "Windows x86" (for 32-bit Windows OS). You can check whether your Windows OS is 32-bit or 64-bit via "Control Panel" ⇒ (Optional) System and Security ⇒ System ⇒ Under "System Type".
Step 2: Install JDK and JRE
Run the downloaded installer (e.g., "
jdk-8u{xx}-windows-x64.exe"), which installs both the JDK and JRE. By default, the JDK will be installed in directory "C:\Program Files\Java\jdk1.8.0_xx", where xx denotes the upgrade number; and JRE in "C:\Program Files\Java\jre1.8.0_xx".
Accept the defaults and follow the screen instructions to install JDK and JRE.
Check the JDK installed directory by inspecting these folders using File Explorer. Take note of your JDK installed directory, in particular, the upgrade number, which you will need in the next step.

I shall refer to the JDK installed directory as
<JAVA_HOME>, hereafter, in this article.Step 3: Include JDK's "bin" Directory in the PATH
Windows Shell searches the current directory and the directories listed in the
PATH environment variable (system variable) for executable programs. JDK's programs (such as Java compiler javac.exe and Java runtime java.exe) reside in directory "<JAVA_HOME>\bin" (where <JAVA_HOME>denotes the JDK installed directory). You need to include "<JAVA_HOME>\bin" in the PATH to run the JDK programs.
To edit the
PATH environment variable in Windows 7/8/10:- Launch "Control Panel" ⇒ (Optional) System and Security ⇒ System ⇒ Click "Advanced system settings" on the left pane.
- Switch to "Advanced" tab ⇒ Push "Environment Variables" button.
- Under "System Variables" (the bottom pane), scroll down to select "Path" ⇒ Click "Edit...".
- For Windows 10 (newer releases):
You shall see a TABLE listing all the existing PATH entries (if not, goto next step). Click "New" ⇒ Enter the JDK's binary directory "c:\Program Files\Java\jdk1.8.0_xx\bin" (Replacexxwith your installation number!!!) ⇒ Select "Move Up" to move this entry all the way to the TOP.
Step 4: Verify the JDK Installation
Launch a CMD shell via one of the following means:
- Click "Search" button ⇒ Enter "cmd" ⇒ Choose "Command Prompt", or
- right-click "Start" button ⇒ run... ⇒ enter "cmd", or
- (Prior to Windows 10) click "Start" button ⇒ All Programs ⇒ Accessories (or Windows System) ⇒ Command Prompt, or
- (Windows 10) click "Start" button ⇒ Windows System ⇒ Command Prompt
Issue the following commands to verify your JDK installation:
- Issue "
path" command to list the contents of thePATHenvironment variable. Check to make sure that your<JAVA_HOME>\binis listed in thePATH.
Don't typeprompt>, which denotes the command prompt!!! Key in the command (highlighted) only.// Display the PATH entries prompt> path PATH=c:\Program Files\Java\jdk1.8.0_xx\bin;[other entries...]
- Issue the following commands to verify that JDK/JRE are properly installed and display their version:
// Display the JRE version
prompt> java -version
java version "1.8.0_xx"
Java(TM) SE Runtime Environment (build 1.8.0_xx-b13)
Java HotSpot(TM) 64-Bit Server VM (build 25.5-b02, mixed mode)

// Display the JDK version
prompt> javac -version
javac 1.8.0_xx
Step 5: Write a Hello-World Java Program
- Create a directory to keep your works, e.g., "
d:\myProject", or "c:\myProject", or any directory of your choice. Do NOT save your works in "Desktop" or "Documents" as they are hard to locate. The directory name shall not contain blank or special characters. Use meaningful but short name as it is easier to type. - Launch a programming text editor (such as TextPad, or NotePad++, or Sublime Text, or Atom). Begin with a new file and enter the following source code. Save the file as "
Hello.java", under your work directory (e.g.,d:\myProject)./* * First Java program to say Hello */ public class Hello { // Save as "Hello.java" under "d:\myProject" public static void main(String[] args) { System.out.println("Hello, world!"); } }
Step 6: Compile and Run the Hello-World Java Program
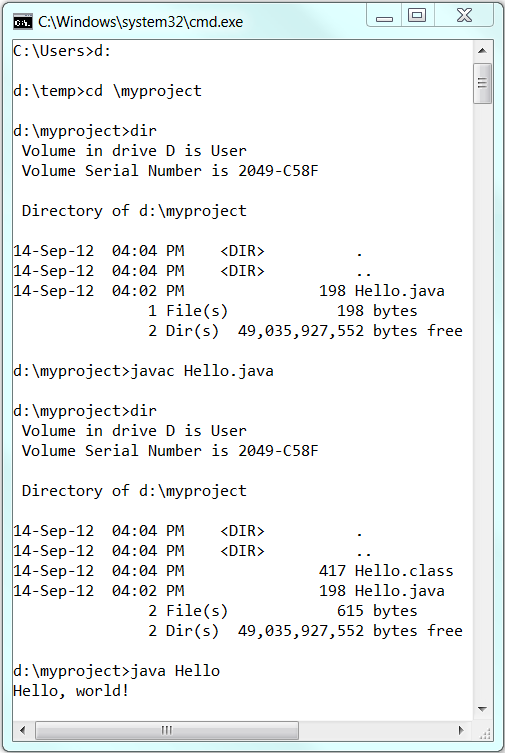
To compile the source code "
Hello.java":- Start a CMD Shell (Click the "Start" button ⇒ "run..." ⇒ Enter "cmd").
- Set the Current Drive to the drive where you saved your source file "
Hello.java". For example, suppose that your source file is saved in drive "d", enter "d:" as follow:prompt> d: D:\xxx>
Don't enterprompt>, which denotes the command prompt. - Set the Current Working Directory to the directory that you saved your source file via the
cd(Change Directory) command. For example, suppose that your source file is saved in directory "d:\myProject".D:\xxx> cd \myProject D:\myProject>
- Issue a
dir(List Directory) command to confirm that your source file is present in the current directory.D:\myProject> dir ...... xx-xxx-xx 06:25 PM 277 Hello.java ......
- Invoke the JDK compiler "
javac" to compile the source code "Hello.java".D:\myProject> javac Hello.java
The compilation is successful if the command prompt returns. Otherwise, error messages would be shown. Correct the errors in your source file and re-compile. Check "Common JDK Installation Errors", if you encounter problem compiling your program. - The output of the compilation is a Java class called "
Hello.class". Issue adir(List Directory) command again to check for the output.D:\myProject> dir ...... xx-xxx-xx 01:53 PM 416 Hello.class xx-xxx-xx 06:25 PM 277 Hello.java ......
To run the program, invoke the Java Runtime "
java":D:\myProject> java Hello
Hello, world!


0 comments:
Post a Comment
Let us know your responses and feedback